Friday, July 5, 2013

It's been a long time coming... The Final Project Post

So it has been far too long since my last post.  8 months, to be exact.  I should have posted long, long ago.  Laziness, burn out, whatever you want to call it.  The fact remains, the kitchen has now been done since the middle to end of November.

Done.

Finished.

Well, almost.

It was completed to my satisfaction, but I had to do 2 more things to satisfy the City of Columbus.  The final electrical inspection, and the final building inspection.  I was scared about those 2 final inspections, not because I didn't think I did things up to code.  I was careful to do everything I could to code, or better than code.  The fear was, the code book is around 1000 pages, and a grumpy inspector could possibly find something not to code, that I had no idea about.  I was so happy that it was done, I was afraid to have them find something I did that they didn't like.

I thought I had plenty of time.  My permit was good for a year, and I bought it in May of 2012.  February 2013 rolled around, and, what's this?  A certified letter (and separately sent regular mail letter, arriving the next day) stating that my permit had expired.  Little did I know, the "1 year expiration" of the permit that I was told about, only applies to starting the work.  Once I have the first inspection, a 6 month countdown starts.  Before those 6 months are up,  I have to have another inspection.  At that point, the 6 month countdown begins again.  This was buried in the fine print.  What happens when that 6 month countdown expires?  Your permit expires!

It would have been nice if, say, 2 weeks before it expired, their system sent me a quick note to say, "Hey, your permit is about to expire, better get an inspection!"  The Columbus Library does this to remind me when a book is about to be due.  But then I wouldn't have had the pleasure of filling out the permit paperwork again, taking another 1/2 day off work, going down to the permit office again, and paying again for the expired permit.  Thankfully, the guy handling the permits that day was friendly.

So...  New permit in hand, I schedule the final electrical inspection.  The inspector comes, looks at my paperwork, my plans, and walks around with a little GFCI socket tester, testing most of the outlets.  Inspection:  Pass.

Last inspection is the "building inspection."  It's in quotes because honestly, I don't know what it's for.  And that scares me.  Another bout of a little laziness, and a LOT of busy-ness, but I'm well aware of the 6 month countdown, this time.  Finally, earlier this week, I bite the bullet, and call for the inspection, and it's scheduled for July 3rd.  I asked that they call 15-30 minutes before, so I can run home to be there for the inspection.

The morning of July 3rd, the inspector calls just after 8am, before I've ever left for work.  He says, "Sorry, we're swamped.  Best I can tell you, is between 9 and 11am."  Well, that's a bummer.  So, I plan to take a 1/2 day off work.  8:30, inspector calls back and says he has one inspection a couple blocks away, and he'll be there soon.  9am rolls around, and he's there.  He walks in, looks at the paperwork, looks at my kitchen, says, "Looks good."  Inspect: Pass.  He said that basically, he's there to see that the project is done, and that all the other inspectors had signed off.

So now, it's official.

Our kitchen project is done.

While it has been 16 months since the project started, we were only without a functional kitchen for just under 4 months.

And so, finally, I present to you photos of the finished kitchen!

We'll start off with a 360 Panorama of the finished kitchen.  Sorry about the stitching issues, I did several and it was the best I could get.

And some smaller panoramas.  As usual, click for a larger image.

North side of the kitchen.

South side of the kitchen.

Final view of the new window, along with the whale and alligator salt and pepper shakers (they came packaged like that)

The  sunlight hitting our coffee maker and TARDIS travel mugs.

A few days a year, the sun lines up and comes in through the new window.

Natural light view of the north side of the kitchen

Happy with the expanded storage and countertop to the left of the stove.

Christmas decorations!

We replaced the old roller shade with a 2" faux wood blind that matches the rest of our house.

The new countertop has been wonderful for our Bible study potlucks and cookouts.

The before and after.
Looking back, I'm glad we did it.  God worked the timing out well.  It was unusually dry last summer, which kept me from having to mow the lawn every week, which would have killed a weeknight.  Along with the grass drying up, so did my freelance jobs.  I had just handful come along during the project, which would have killed multiple nights/weekends.  As soon as the kitchen was done, they started ramping back up.

It was a lot of hard work.  It wasn't necessarily harder than I thought it would be, it just took a lot longer than I thought it would, overall hour-wise.  I couldn't even begin to guess how many hours I worked... A lot.  

My favorite parts of the new kitchen are silly, but practical.  Since every major device has its' own circuit, I can run the toaster and the microwave at the same time, without tripping the breaker.  Also high on the list is the added countertop space (doubled the useful space), and 7 drawers now, instead of 1.

And those old kitchen cabinets that I removed?  They live on as a workbench and storage in our basement.  


So, there you have it.  

Our IKEA Kitchen.

Tuesday, November 6, 2012

Tile backsplash complete!

Updates are fewer and further between now, and quite honestly, will wrap up in just a handful of more posts.

That's because...

I'M ALMOST DONE!

When I last left off, I had tiled along the wall by the new, small window. Next up was the longest wall, at around 11'.  Plus, it had the existing window the tile around.  I bought a few bull nose tiles, as I was going to try to do that around the window, but I just felt that it didn't work.  I ended up just cutting whole 3x6 tiles to fit.  I did, however, spend an hour or two measuring, marking, and otherwise determining the best layout for the tiles.  This is the only wall where tiles end at both walls, so my biggest concern was centering them around the window.  I believe it worked quite well.

Left side

Right side
With that done, all that was left was the wall behind the stove, no windows, long run, and just two outlets to cut tile around. 

Then, on to grouting!

The internet can be a good source of information.  It can also be a bad source of information.  I sure hope this blog is not a bad source of information.  :)  The subway tiles we used are standard ceramic, and the greenish/brownish accent tiles are glass.  Grout is sanded, or unsanded.  When searching on the internet, about 50% of the time, people say sanded grout will not hurt glass times.  And about 50% of the time, people say that sanded grout will scratch the glass tile.  Since the tile is on a wall, and not subject to a lot of stress, I went with the unsanded grout.

For the amount of tile I had, I calculated I would need a 10lb bag of grout.  1lb bags are $5.  10lb bags are $11.  I wanted to grout in stages, but the recommendation is to mix the entire bag.  I didn't want to spend $50 for $11 worth of grout.  So, I put my big boy pants on, got everything ready, and mixed my 10lbs of grout with recommended 44-48oz of water.  46oz to be exact. 


And I grouted.  And grouted.  And grouted.  It took around an hour, maybe a little more.  It wasn't difficult work, but it was hard work.  Very hard.  In hindsight, I probably should have used the full 48oz of water.  Even after half an hour, I could feel the grout start to firm up. 

But it looked good.  Real good, if I may say so myself.  :)


I was concerned that in a few places, where the tiles were pushed a little closer to the wall than the others. I was afraid that they would stick out further once the grout was in place, but it was the opposite, really.  The grout served to smooth out small inconsistencies. 

After 30 minutes of drying, you use a wet sponge to clean the haze off the tiles. 

And clean.

And clean.

And clean. 

It takes a long time, and you have to keep rinsing out the sponge.  And you'll probably need to do it the next day too, once it's all over with.

Once the tiles (and countertop) were all cleaned off, I needed to seal where the countertop meets the tile.  I used white silicone caulk, since it supposedly lasts longer than latex caulk. 


So there you have it, the final major task in the kitchen renovation.  There's a little more baseboard trim I need to do, and I've got to tighten the water connection for the ice maker... but that's it.  Oh yeah, and the final inspections. Sarah has completed moving stuff back into the kitchen, and will soon be making cheese grits, and pepperoni rolls, and all manner of tasty things that she makes so well. 

Monday, October 15, 2012

Doors! Painted! Lighting! And tile backsplash - Section 2 of 4

Slowly, slowly, I am wrapping this project up.  The funny part is, I'm still just as busy as I've ever been, it just seems to not be on kitchen project stuff.  However, progress is being made.

I finally got both doors painted, both sides.  Finally had to give up on trying to do it in the garage, because it got too cold.  Had to put the cat box upstairs, block off the basement door opening, and paint on my "workbench" (aka, wonky pool table covered in plywood), while Charlie pawed at the piece of wood I had blocking off the basement doorway.

Doors painted!  And hung!  And cat door installed!  (that will be another blog shortly, since I forgot to take pictures)

Also, I did the final section of under cabinet lighting.  That one too awhile, because it was the run with the built-in microwave.  I was just going to run wires under/around the microwave, but decided at the last minute to go ahead and stick a strip of lights on the bottom of the microwave as well.  Why not, it's not going anywhere anytime soon!  That gives a nice, even light all across the cooking and prep area.

The hardest part was installing the last dimmer.  Because I could not find the dimmer.  A good hour plus, checking everywhere, basement, office, garage, cabinets, toolbox... I knew I had left it on the new counter with everything else, the anti-static bag was there, shipping bag, LED reel, etc.   I had resigned myself to having to order a new one when Sarah noticed it, still in its' bubble wrap bag, peeking out from under the table in the entryway.  From what we can piece together, Charlie got on the counter, found a toy, and played with it until it was out of her reach.

Deco strips have been removed for light installation/tiling convenience 

Just the under-cabinet LED lighting on, no overhead lighting - 20 watts total

Once the dimmer was found, and installed, it became... tile time.

The first section of tile was easy.  Long, straight shot, just 2 outlets to cut around.  This next section was similar with 2 outlets, but it also has the new window, and it's a little more cramped under the corner cabinet.  Realistically, if you can, install your tile back splash before you install your cabinets.  That's pretty unrealistic for just about anyone.

I wanted a simple trim around the windows, so I got some really small shoe moulding from Lowes.  Same thickness as the tile, so it should blend in fairly seamlessly.  I used contact glue to glue it around the window, so I wouldn't have to patch any nail holes.

Tiling this section was pretty much the same routine as the last, just a little more cramped, and a lot more cuts.  Not counting the glass accent tiles (which did need to be cut in some places), I only had 14 tiles across the whole section that didn't need cut.

There you have it.  Section 2 of 4 tiled.
 Finally, as previously referenced, our friend Ross is a Browns fan, and came over and wrote "Go Browns!" on the wall (with permission).  Apparently, his devotion to his "team" has had a negative influence on their season.  They hadn't won a game since November 20th, 2011, until the day I tiled over his graffiti.  Coincidence?  I'll let you decide.

Oh yes, I defaced his defacement before it was tiled over.

Wednesday, October 3, 2012

More under cabinet lighting

Still going slow on the final bits to get the kitchen all done.  Last week I installed the baseboard and door trim.  Much better looking than door gaps.  Also, I started the process of painting the doors.  Not a fast process, considering I have 2 doors, and 2 sides to each door, and need to put 2 coats of paint on each side, and each side has to wait a minimum of several hours.  And I only have 1 set of saw horses to paint the doors on..  (adds in head)  It's going to take a week or more to paint the doors, unless I want to build some fancy flipping door painting jig, or buy another set of saw horses.

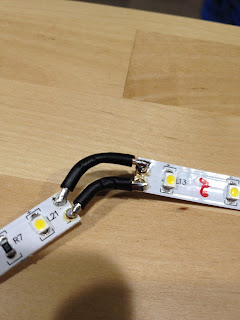
So, in the mean time, I tackled the under cabinet lighting for the north/east cabinets.  There's a couple 45 degree bends as the cabinets turn the corner.  It was a test of my soldering skills, as the solder pads on the lights are rather small.


Yup, the solder pads are under there.  Somewhere.

I measured and "built" the strands in the basement, taping the strands down at the correct angle, since they're flexible and want to go everywhere.

When I was done, I had the following contraption:

Strand of lights, 45 degree angle, strand of lights, 45 degree angle, and strand of lights with power connector.

The solder stuck very well, I tested on a scrap, and was unable to pull the wire/solder off.

A quick drill through the cabinet to run the wire, and hooking it up to the dimmer, and here's the resulting light as seen from the porch:


Now I have enough light on that side, to install the tile.  I still need to cut, solder, and install the lights on the other side of the kitchen.  Then I'll have zero excuses for not finishing the tile.  :)

Tuesday, September 25, 2012

Under cabinet lighting, and tile backsplash

It has been a week and a half since the last blog post, so you'd think I'd have more done than I do.  But I don't.  Doesn't mean I haven't been working, I just haven't been working myself the long hours that I had previously.

I installed the deco strips (trim under the upper cabinets, see here) and toe kicks (trim under the base cabinets, covering the feet).  Those were relatively straightforward, the only major hint I have for the deco strips would be to attach the right angle brackets to the deco strip, then hold it in place under the cabinet.  Use a pen to mark along the entire length of the elongated hole bracket (you'll know what I mean).  Pre-drill in the middle of the marked area, careful not to drill through into the bottom of the cabinet.  Start your screws in the holes, then place your deco strip in screws before tightening them down.

Toe kicks were also fairly simple.  Measure, cut to size, stick the clips on the back and pop onto the legs.  IKEA really did make it easy.


Next up was the under-cabinet lighting for the new section (my guinea pig section).  You can read more about the type of  lights I used in this blog post.

Lights with deco strip

Lights and dimmer without deco strip

This section was easiest, because it was simply a cut to fit, stick on, and mount the dimmer. The lights look really good, the color is nice and warm. Still hard to believe the whole section was only $25.

Deco strips, done, toe kicks, done.  Tile backsplash and baseboards are left.  I've done plenty of baseboards before, and I usually gravitate towards what I've already done...  But I really wanted to see what the tile looked like.  

The tile will be mostly 3"x6" subway tile, with a 3" high strip of 1" greenish glass tiles for an accent strip.  We've had the tile since May, possibly even April.  I've never done anything with tile before, so I was rather intimidated.  I measured, I marked, I calculated, I played with the layout on Google Sketchup.  How many tiles would I have to cut?  How hard would it be?  Should I calculate it all out first, and make all the tile cuts before I start spreading mastic?  Well, I got tired of trying to figure out on paper (or screen) something I'd never done before, and tiling is always made out to be an easy task on the HGTV shows, so I figured I'd just go for it.  I used mastic rather than thinset because 1) it's easier to work with, and less droopy than thinset, and 2) it's premixed, so you can work in small batches if you need to.  From what I understand, mastic isn't water proof/resistant, so it's okay for backsplashes, but not for bath/tub surrounds.

My friend Phil let me borrow his wet tile saw, and I tried it out on a tile.  Cuts beautifully. Didn't need to cut the tiles before the project, just measure and mark on the tile where it needs cut, walk it out to the saw, and cut it.   So Saturday morning (September 22), I started tiling.  First 5-10 tiles, it was very, very slow going.  I thought it was going to take me forever.  Then, I started picking up speed.  The 7 1/2' backsplash took about 4 hours total. If you're into calculations, that means I can tile at 0.000355113636 miles per hour.  


I think it came out pretty good for a first time at tiling.  I see there were a couple tiles that I didn't get quite as even with the other tiles, as far as how far they stick out from the wall.  Hopefully wont be too noticeable with the grout, we'll see.  The grout is another day, as according to what I've read, you want to mix the whole bag.  I want to get the other cabinets' lighting done first, as it was rather convenient to tile with the lighting right there.  


Thursday, September 13, 2012

Dishwasher, doors, and more!

Thursday, September 6th - Plumbing is the part of this project that I was least comfortable with.  Specifically, "supply" plumbing, the part under pressure that brings water to you.  I don't think I mentioned it on the blog, but you may have noticed during the renovation, any shot of the sink area/pipes included an old red plastic coffee container.  That was because after removing the copper tube running to the dishwasher, the valve developed a very tiny drip.  Tiny in that I would have to empty that red bucket every week or so.  With the project coming to an "end", I finally needed to tackle that.  Had I known how easy it was, I would have done it long ago.  Really, it was a matter of turning off the hot water at the water heater, using a wrench to remove the compression valve, putting the new valve on, and tightening it down.  That's it.

So I figured, with the "supply" part of the sink done, the drain part should be easy.  Except I'm a super-novice plumber, and was rather overwhelmed by the vast array of plumbing parts at my local Lowes.  Father-in-law Kevin came over again to help out.  In fact, I'm such a novice, that I'm not even going to detail what I did to get the sink drain working.  The important part is, it works.  :)  I do still need to hook up the 2nd bowl, we didn't quite have the right fittings for that.  But the sink and garbage disposal works, it beats washing dishes in the basement.

Friday, September 7th - Dishwasher installation.  Because of the size and shape of the kitchen, the dishwasher is 24" wide, and the hole it fits in is roughly 31".  I used a couple of large L brackets, and cut a Perfekt cover panel down to size, and mounted it to the side of the cabinet to the right of the dishwasher.  Sturdy, and fits well, and doesn't look weird at all.  If I were super-awesome, I would have made it a little vertical "shelf" to hold cookie sheets.  At this point, I just want a working kitchen.

From what I can tell, there's 2 ways to hook up a dishwasher.  The easy way, with a vinyl or rubber or some type of hose that goes from the valve to the dishwasher, and the hard way, with a flexible copper tube that goes from the valve to the dishwasher.  The vinyl or rubber hoses wear out over time, and can leak, sometimes catastrophically.  Companies make special hoses that "detect" when there's a catastrophic leak, and automatically shut off the water.  Unfortunately, from the reviews I read online, they don't work well, and tend to fail rather often.  The copper tubing, on the other hand, will last far, far longer than the dishwasher ever will.  I decided that I'm not a fan of leaking, so I went the old fashioned and difficult way with the bendable copper tubing.

Difficult doesn't begin to explain it.

Again, perhaps it's just because I'm a super-beginning plumber, or I don't have the right tools, but the copper tubing was just really hard to work with.  It snakes through a hole in the side of the sink cabinet, and then has to work its' way to the front of the dishwasher.  Because of the nature of the copper tubing the fitting it goes into points towards the back of the dishwasher, making it very tough to get a wrench in to tighten it.  It took a couple rounds of "I think that's tight enough." (water on, drip, drip, drip) "Poop, no it isn't." before I finally got it tight enough to be leak free.

Saturday, September 8th - My father-in-law Kevin came over once again, and we installed the two new interior doors.  No major problems or snags there, just the usual fighting with the doors, trimming, leveling, shimming, and nailing in place.


I'm not sure I'm totally happy with the quality of the doors.  Maybe that will change once they're painted, right now they're just primed.  They're Menards' "Duracore" doors, meaning they're hollow-core, but filled with 3M foam.  They seem to block sound pretty good, and have a satisfyingly "solid" feel when you close it.  They just seem rather cheaply made.  It will be one of those "time will tell" things.

I made a mistake installing the first door knob.  In my defense, the directions should have been a little clearer up front.  But I should have paid more attention and read completely through the directions before I started.  The jamb was cutout for the strike plate, and the door had cutouts for the handle and the closer mechanism (whatever it's called), but it wasn't cutout for the metal plate that goes around the spring latch... thingy.  So I used a chisel to carefully chisel out the door where the plate goes.  Problem was, that part of the door is practically cardboard.  Ugh.  I then continue following the instructions...  At the end, as an, "Oh, by the way..." sort of thing, it says that if your door isn't cut out for the metal plate, you can remove it and use the little round metal pieces that come in the package.  Ugh.  So needless to say, the second door knob went on much, much faster.

After the doors, we continued drilling for and installing handles.  IKEA has a nifty little plastic guide for making sure your handle holes all get drilled in the same place.  I also put on some of the cover panels on the end cabinets, hiding the rest of the birch colored part of the Akurum cabinet frames.


There's a paper towel holder... toaster oven... coffee maker...  Kitchen table!!  Saturday was also move-back-in day to the kitchen, marking the end of just under 4 months of cooking in the living room.  The kitchen isn't officially done, but it's functional.

Sunday, September 9th - A quiet, restful Sunday.  Put on a few more cover panels, and, since the fridge is coming back in Monday and it would otherwise be hard to access, I also installed the deco strip under the cabinet over the fridge.


Monday, September 10th - Kevin and Phil came over, and between the three of us, along with extra plywood on the floor, managed to safely wrestle the refrigerator back to it's home.  Like the dishwasher, I went the copper tubing route to supply water to the ice maker.  The fridge is substantially easier to access though.

A happy wife in a functional kitchen!
Yet to do:  Tile backsplash, toe kicks, deco strip, undercabinet lights, and baseboards.  That list is getting mighty short.

Wednesday, September 12, 2012

Cabinets and Countertops - Part 2

Monday, September 3rd (Labor Day) - Today was a big day...  Countertops!  Father-in-law Kevin came over to help again.

We went with the Pragel stone effect black counters from IKEA.  They're beefy, a full 1.5" thick the entire depth.  Most laminate countertops are thick at the front, and then drop down to around 3/4" for the rest of the counter.  It also makes the 8' section weigh in at around 100lbs.

We had two 6' pieces, and two 8' pieces we needed to cut down to fit.  In hindsight, I wish we had gone with three 8' and 1 6' pieces...  The price difference between the 6' and 8' is only $10 ($59 for 6', $69 for 8'), and we would have had a large enough cutoff to put a matching countertop over the washer/dryer in the mud room.  Oh well.

First things first, we mounted the microwave.  Fairly simple process, take your time measuring and mounting the wall-mount plate, then it should tilt into place, and screw in to the bottom of the cabinet above it.  Make sure you cut your power cord and mounting holes in the cabinet first.  Before the microwave was mounted, we were concerned at how massively huge it looked.  Once it's mounted, you don't see much other than the door, so that was a relief.

After the microwave was installed, we brought the stove in from the garage, so we could confirm the mounting location of the final cabinet, a 3 drawer cabinet to the left of the stove, the only major design change from how the original 1960s kitchen was.

The weight and thickness of the countertops for some interesting cutting.  IKEAFans.com is a great resource for information on IKEA kitchens and other products.  I didn't have to post a single "How do I..." post, so many people have been there before with the same questions, all I had to do was read and find the answers!  Anyway, back to the cutting...  The suggestions from IKEAFans.com had me do the following:  Cut the countertops face down, with a 60 tooth Diablo ultra fine finish blade in my circular saw.  Use masking tape along the cut to eliminate (or at least minimize) any chipping of the laminate.  Go slow. I don't remember seeing this anywhere, but I would add in this:  Start your cut from the front of the countertop rather than the back.  Also, not sure if this is common sense or not, but the father-in-law suggested clamping a straight edge, in this case my drywall ruler, and using it as a guide for the circular saw.  It made for some nice, straight cuts.  Even with all of that preparation, we did still have some chipping.  Thankfully, because the countertops are so dark, a black Sharpie has done a nice job hiding some of the nicks!  I will probably look into some black silicone caulk and see if that helps cover it, as well as seal it.

Speaking of sealing, because the countertops are particleboard, you'll want to seal the edges, so water doesn't get in.  What I did was get a tube of clear silicone caulk, squeeze it on the cut side, and smear it in real good with your finger.  Dries fairly quickly, but stinks baaaad.

The toughest part of the entire day was cutting the hole for the sink.  I used a forstner drill bit at the four corners to get a place for my jigsaw in.  I then used a reverse blade, brand new, high quality Bosch.  The reverse blade cuts on the downstroke, minimizing laminate chipping.  Maybe I just didn't have the right blade, but cutting for the sink was a nightmare.  The blade end furthest from the saw kept bending and not cutting straight up and down.  The end result was an atrocious looking cut, that thankfully in no way took away from the structural integrity of the countertop.  Seal it with the silicone caulk like the other cuts.

I was pretty tired at that point, but as it seems with most nights, there's always little stuff that needs to be done.  Tonight was no exception, I cut holes in the back of the cabinets to access the under-cabinet lighting outlets.  Didn't feel like cleaning up for the picture, so you get a big-old-mess photo of the progress.


Tuesday, September 4th - Kevin came over to help once again.  We screwed down the countertops.  It was as easy as getting in the cabinets, carefully drilling pilot holes, and using the screws supplied with the cabinets to secure the countertops down.  We also mounted the faucet to the sink, and the sink to the countertop.  Faucet hoses too short, oops!

Speaking of faucet hoses...  I read many complaints on different internet sites about IKEA faucets, and how they're sized metric, and don't fit American plumbing systems correctly.  I had a moment of panic myself when the instructions said the US version comes with 9/16" hoses, and I knew that wasn't a normal size.  I looked at the PDF of the instructions on IKEA's site, and it said 1/2", so I think maybe it was a printing error?  Either way, once I found the right 3/8" to 1/2" hose extension at Menards (no easy feat), the faucet hooked right in, perfectly.

Running low on energy for big stuff, I finished the night by installing more cabinet doors, and mounting the first handles in the cabinet to the upper-left of the stove.


Wednesday, September 5th - Not much work done that night, as our Bible study is back to meeting after a summer break.  I did manage to install even more drawers and doors, so it visually looks like I did a lot more than I actually did.


That's it for Part 2.   Part 3 coming up shortly, with plumbing and dishwasher excitement!